
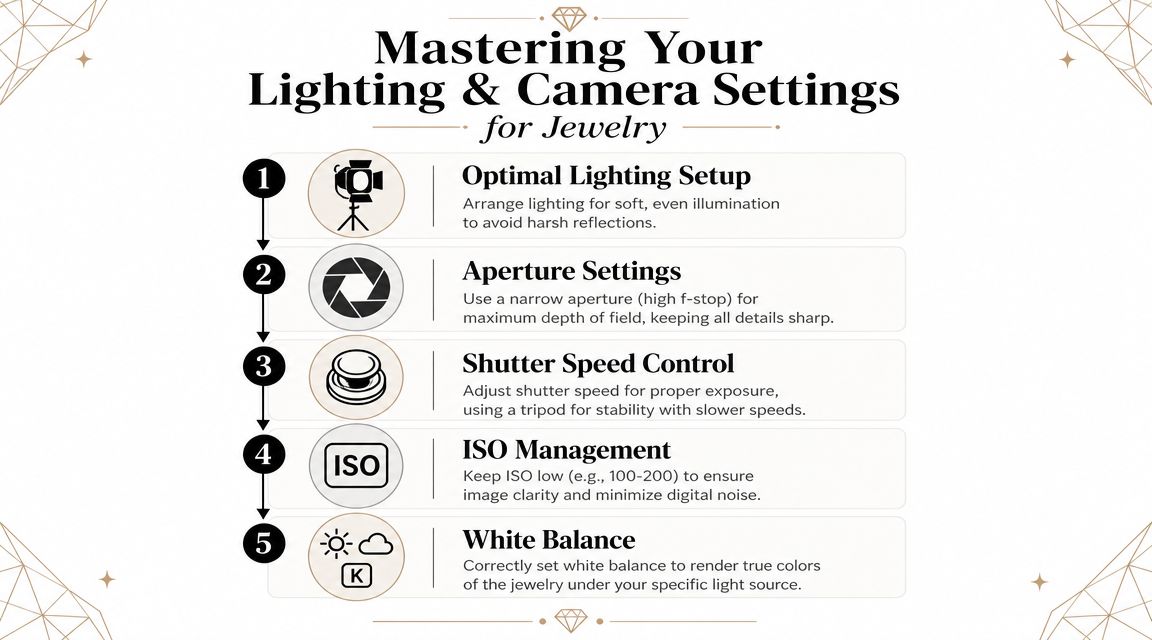
To photograph jewelry well, use a clean neutral background, soft diffused light, and a camera or phone that can focus close. For sharper detail, the strongest setup uses a macro lens with 1:1 magnification, apertures around f/11 to f/16, and for the most precise results, a tripod with focus stacking and ISO at 100–200.
If you're trying to sell a ring, get a preliminary appraisal, or send photos for a remote evaluation, the goal isn't an artistic image. The goal is a clear, honest photo that shows metal color, stone detail, hallmarks, wear, and scale without glare or blur. That difference matters because an appraiser can't judge what the camera never captured, and a buyer won't trust what looks misleading.
A client usually reaches this stage after opening a jewelry box, taking one quick phone photo, and realizing the picture looks nothing like the piece in hand. Diamonds go dark, gold turns orange, and polished metal reflects the whole room. Good jewelry photos fix those problems by controlling light, distance, and angle so the item looks like itself.
Table of Contents
Preparation Is Everything Before You Take a Photo
A jewelry photo usually fails before the camera comes out. Dust sits on prongs, lotion smears the metal, fingerprints mute the stone, and the background competes with the item. For valuation and selling, preparation isn't cosmetic. It determines whether the image shows the actual condition of the piece.
Clean first, shoot second
Start with the safest cleaning approach you can manage at home. Use a soft microfiber cloth and handle the item by the edges when possible. If the piece has a chain, clasp, or underside gallery, clean those areas too because they often appear in close-up photos.

A simple approach works well for many pieces:
Polished metal: Wipe with a clean microfiber cloth to remove prints and haze.
Chains and clasps: Check links, jump rings, and closures because residue collects there.
Gemstone surfaces: Remove visible smudges gently so facets don't look cloudy in the photo.
Undersides and backs: Clean areas buyers and appraisers often ask to see, especially around settings and hallmarks.
If you're unsure how a specific alloy may react, it's worth understanding the metal first. A quick primer on the difference between 14k and 18k gold helps explain why color and wear can appear differently from piece to piece.
Practical rule: If you can see lint with your eye, the camera will see more of it than you expect.
Choose a background that helps valuation
Use a plain white, gray, or other neutral surface. A folded sheet of white paper, a matte card, or a clean tabletop often works better than patterned fabric or a dramatic prop. The point is to isolate the item so the viewer can study shape, finish, and condition.
For selling, I usually advise clients to avoid heavy styling. Flowers, stones, mirrors, and decorative trays can make a photo look attractive, but they also hide proportions and distract from wear. A plain setup is more useful when an appraiser needs to inspect a shank, clasp, hinge, or back plate.
A stable work surface matters too. If you're trying to improve your setup beyond a kitchen table, Encore Film And Music Studio's guide gives a practical overview of what to look for in a photography space, especially if you need room, controlled light, and a quiet environment to work carefully.
Mastering Your Lighting and Camera Settings
A client will often send us a ring photo that looks bright at first glance, but the table facet is blown out, the prongs disappear into reflection, and the gold has turned a different color under mixed bulbs. At that point, a preliminary valuation becomes slower and less certain. Good lighting does not just make jewelry look attractive. It preserves the details an appraiser needs and gives a buyer fewer reasons to hesitate.
Use light that you can control
Soft, consistent light is the goal. Polished metal behaves like a mirror, so every uncontrolled light source creates a new distraction. Visual Education's jewelry lighting guide recommends diffused light from more than one direction and stresses keeping the color temperature consistent across all lamps. That matters in valuation work because glare can hide scratches, wear, and even the true outline of a setting.
Two home setups usually work well enough for a preliminary review.
Setup | Best use | Common valuation problem |
|---|---|---|
DIY light tent | Even light on reflective metals and small stones | Flat photos that hide depth if the light is too uniform |
Indirect window light | Accurate color and softer shadow transitions | Shifting brightness from clouds or stray room light |
A basic light tent can be made from a box, white paper, and thin white fabric or tracing paper over the side openings. It reduces harsh hotspots on high-polish gold and platinum. The trade-off is that stones can look lifeless if everything is too diffused, so leave enough direction in the light to show facet contrast.
Window light is often the better choice for color, especially if you are trying to show the difference between white metal, yellow gold, and rose gold. Use one window. Turn off nearby lamps. Place a white card opposite the window to lift the dark side of the piece without adding a second color cast. If you want a broader explanation of controlled light, learn lighting from AI Photo Generator for general techniques that apply well to jewelry.
The video below gives a useful visual sense of setup and positioning.
Camera settings that reveal detail
Sharpness affects price confidence. If the edges of the prongs, hallmarks, or melee stones are soft, an appraiser may not be able to comment clearly on condition or construction, and a buyer may assume the blur is hiding damage.
If you are using a camera, mount it on a tripod and use a macro setting or macro lens if available. Choose a smaller aperture such as f/11 to f/16 when you need more of the piece in focus. That usually helps with rings and cluster designs, where the top of the setting and the shoulders need to stay sharp in the same frame. The trade-off is a slower shutter speed, which makes stability more important.
A phone can still produce usable photos for valuation if it is held still and the focus point is set carefully. Rest it on a support or use a phone tripod. Tap the main stone or hallmark area to focus, then lower exposure slightly if bright metal is washing out detail. Avoid digital zoom. It reduces usable detail right where a buyer or appraiser needs to inspect surface condition.
Color matters as much as focus, especially with diamonds. If you want to understand why an appraiser looks for specific visual clues in a stone, this guide to what a genuine diamond means gives helpful context for the details your photos should preserve.
Keep the setup simple and repeatable. One light type, one background, one stable support, and accurate focus usually produce photos that are more useful for valuation and more convincing in a sale.
Essential Angles for Rings Necklaces and Earrings
A client often sends one beautiful photo and asks for a value estimate. That image may show style, but it rarely shows enough to judge condition, construction, or whether a detail is original. For valuation and selling, the goal is not to make the piece look dramatic. The goal is to make the piece easy to assess.
A practical shot list by jewelry type
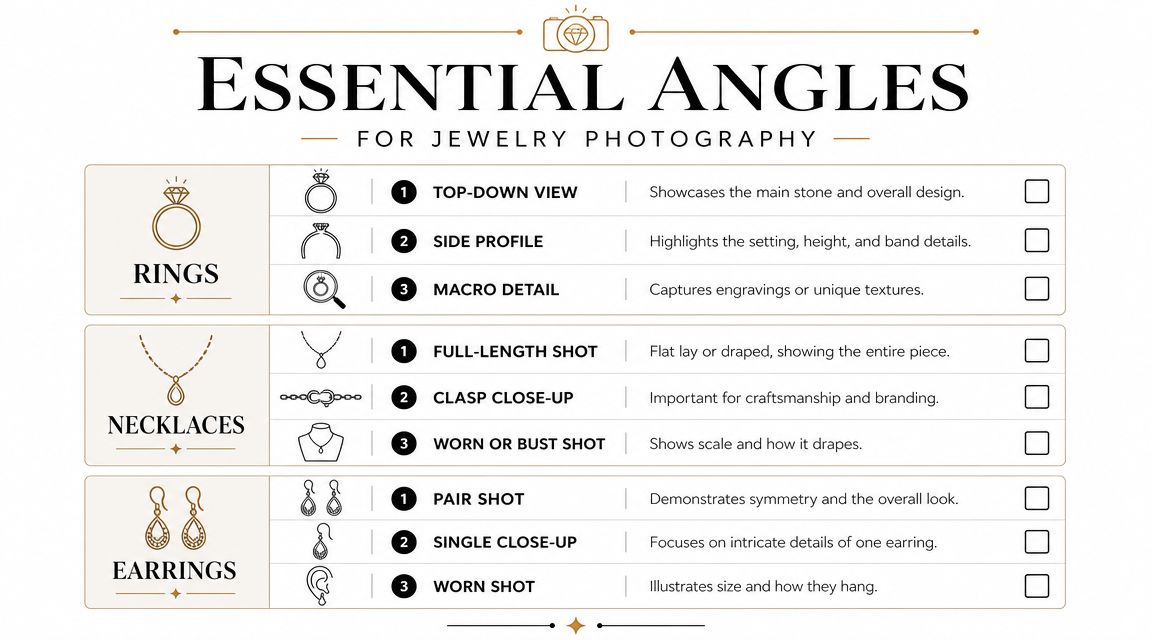
Use a repeatable set of angles. That gives an appraiser enough evidence to comment with more confidence, and it gives a buyer fewer reasons to hesitate.
Rings
Top-down view: Shows the center stone, halo, prongs, and overall layout.
Side profile: Shows setting height, gallery work, band thickness, and how the stone sits in the mounting.
Three-quarter angle: Gives shape, depth, and metal finish in a single frame.
Inside shank and hallmark close-up: Helps identify metal, maker, resizing seams, and wear.
Detail of any damaged area: Shows thinning prongs, chips, scratches, or repair work clearly.
Necklaces
Full-length layout: Shows the complete design, spacing, and proportions.
Pendant close-up: Shows stone placement, finish, and visible wear.
Clasp and end links: Often reveal quality level, repairs, and stamps.
Back view of pendant or links: Helps show whether parts are hollow, solid, cast, or altered.
Earrings
Pair together, front view: Confirms they match in size, shape, and color.
Single earring close-up: Makes small details easier to inspect.
Back view: Shows posts, clips, butterfly backs, and replacement findings.
Side angle: Helps show thickness, setting depth, and whether the pair is made lightly or well.
Loose diamonds or loose stones
Face-up shot: Shows outline, shape, and general symmetry.
Side view: Helps show depth, girdle area, and any obvious abrasion.
Close detail: Can reveal chips, nicks, or residue from a previous setting.
What each angle tells an appraiser
Each view answers a different value question. A top view helps with design, stone arrangement, and overall appeal. A side view often tells more about workmanship, durability, and whether a setting has been rebuilt or repaired. Hallmark photos can change the starting point of an assessment because metal purity, maker's marks, and country marks affect both pricing and how the piece is described for sale.
For chain pieces, construction matters more than many sellers expect. Clear photos of the clasp, links, solder points, and end caps help separate a lightweight fashion chain from a heavier piece with stronger resale appeal. If you are listing chain jewelry, this guide to what buyers look for in gold chains shows why those details matter.
Close-up work is useful here, but only if it serves the evaluation. Fill the frame with the part you want examined, keep edges visible, and avoid angles that hide thickness or wear. A flattering photo may attract interest. A complete set of angles supports price, credibility, and a faster preliminary assessment.
Basic Editing to Make Your Photos Shine
Editing should polish the image, not rewrite the item. If a stone has abrasion, a clasp is worn, or the rhodium finish has thinned, those details need to remain visible. Misleading edits create problems later, especially when a piece is shipped in for review and doesn't match the photos.
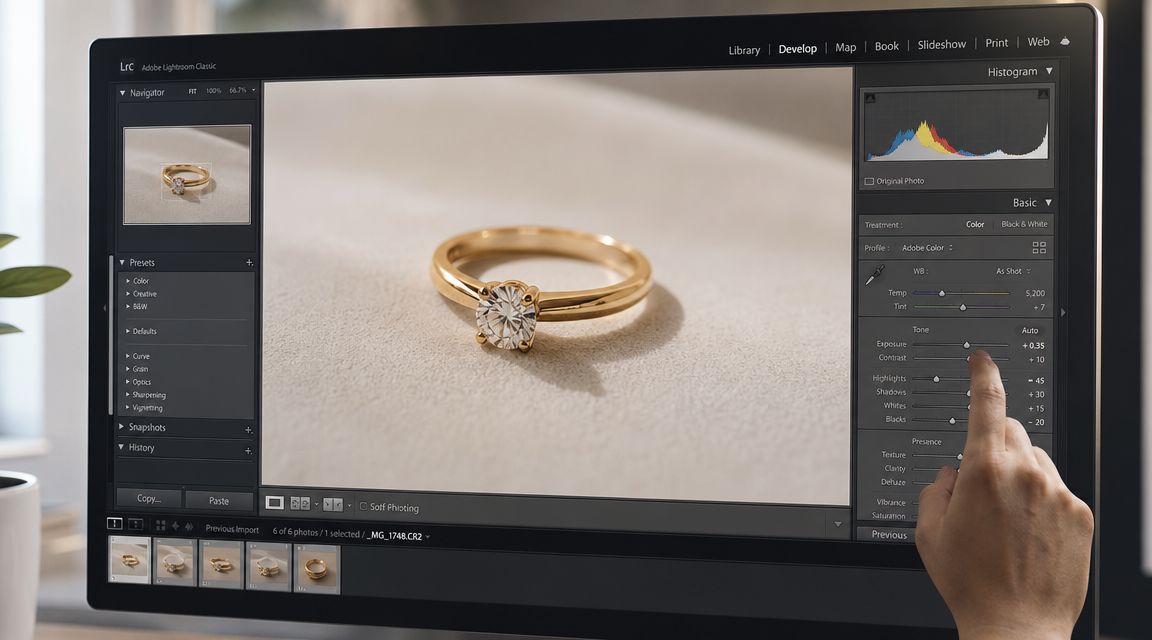
Edit for accuracy, not drama
Keep your adjustments basic:
Crop cleanly: Remove empty space so the item fills the frame without feeling cramped.
Correct brightness: Lift a dull image slightly, but don't blow out metal highlights.
Adjust contrast carefully: Enough to define edges, not so much that stones look darker than they are.
Fix white balance: Gold should look like gold, platinum should stay neutral, and diamonds shouldn't pick up room color.
The Gemological Institute of America warns against mixed light sources such as daylight combined with fluorescent or incandescent lighting because mixed light can distort the appearance of metals and gemstones. GIA also recommends working in one controlled light type and using a gray card or custom white balance instead of relying only on automatic correction, as explained in GIA's guidance on gem photography.
That point matters in editing because many bad color corrections are attempts to repair a lighting problem that should have been avoided at capture.
Simple export choices that make sharing easier
For most clients, a high-quality JPEG is the easiest format to email or upload. Keep the image clear, reasonably large, and uncropped around critical details like hallmarks or damage. If you're sending photos for a preliminary offer, include both full-item photos and close-up detail files rather than relying on one image.
If your end goal is to sell rather than just document, it helps to understand what buyers expect to see before making an offer. This guide on where to sell fine jewelry gives a practical view of how presentation, documentation, and condition affect confidence.
Your Photo Checklist for an Accurate Valuation
A remote valuation depends on completeness. Sharp photos help, but they don't help enough if the appraiser can't see the stamp, the clasp, the side profile, or the wear. When people ask how to photograph jewelry for an evaluation, this is the part that matters most.
The minimum photo set to send
Send a small set that answers the practical questions first.
Entire item: One clear photo of the full piece on a neutral background.
Front detail: A closer photo of the main design or stone arrangement.
Side or profile view: Especially important for rings, cuff bracelets, and mounted stones.
Hallmarks or stamps: Metal purity marks, maker's marks, serial-style markings, and signatures.
Closures and backs: Clasps, earring backs, bracelet hinges, watch-style mechanisms on jewelry pieces.
Condition issues: Chips, dents, thinning prongs, solder marks, missing stones, or bent components.
Scale reference: A ruler beside the item can help with size when proportions aren't obvious.
For high-detail review, a focus-stacked image is the gold standard. That means taking multiple shots at different focus points and merging them so the whole piece is sharp, which is best done on a tripod with ISO at 100–200 to minimize noise, as described in Orbitvu's guide to focus stacking for jewelry.
What slows down a remote evaluation
The most common problems are simple:
Problem | Why it hurts valuation |
|---|---|
One glamorous photo only | It hides condition and construction |
Heavy filters | It makes metal and stone color unreliable |
No hallmark image | It leaves metal purity or branding unconfirmed |
Blurred close-ups | It prevents review of prongs, wear, and finish |
If you're organizing several pieces at once, a basic inventory system can help you keep photos, notes, and descriptions matched correctly. Some clients find Vorby's jewelry management useful for tracking collections before sending items out for review.
When someone wants a structured first pass on a ring, Antwerp Diamond Store offers online evaluation requests, which is practical when the owner wants feedback before deciding on an in-person visit. If the item is a diamond ring, this guide on how much to value a diamond ring helps explain why photos of the stone, setting, and hallmarks all matter together.
Frequently Asked Questions About Jewelry Photography
Can I use a smartphone to photograph jewelry?
Yes, if the light is soft and the phone can focus close enough. Stabilize it, tap to focus carefully, and don't rely on digital zoom to create detail that isn't there.
What's the best background for selling jewelry?
A plain white or gray background is usually the safest choice. It keeps the viewer's attention on the jewelry and makes wear, shape, and color easier to judge.
Why does my gold look too yellow or green in photos?
That usually happens because the piece was photographed under mixed lighting or the white balance was wrong. Use one light type only and correct color gently rather than pushing the image in editing.
How do I stop reflections on polished metal?
Diffuse the light and surround the piece with clean white surfaces such as bounce cards or a light tent. Bright point light without diffusion usually creates hard glare that hides detail.
Do I need professional equipment for an appraisal photo?
Not always. A stable phone shot in soft controlled light can be enough for a preliminary review, but small details such as prongs, hallmarks, and fine engraving become much easier to capture with macro capability and a tripod.
Which photos matter most to an appraiser?
The full item, any main stone or design feature, the side profile, the hallmark, and honest images of damage or repairs. If one of those is missing, the review often becomes slower or more tentative.
Should I retouch scratches or wear before sending photos?
No. Clean the item, but don't hide condition. For valuation, accurate wear is part of the information.
Is a worn photo useful?
Yes, sometimes. A necklace on a bust or earrings shown for scale can help communicate size and drape, but it shouldn't replace the clear neutral-background documentation shots.
If you'd like a careful, low-pressure review of your jewelry photos before selling, borrowing against an item, or requesting an appraisal, you can contact Antwerp Diamond. Clients in Atlanta, Buckhead, Sandy Springs, Alpharetta, Roswell, Brookhaven, Midtown Atlanta, and across Georgia often start with clear photos for a preliminary evaluation, then decide whether an in-person review makes sense.